
Taming the Multi-Cloud Chaos: Meet Scaleway Kosmos
veröffentlicht am 17.11.2025 von Muhammad Kamrul Alam
Feeling locked into a single cloud provider? Wishing you could seamlessly use resources from different clouds without the operational nightmare?
That's exactly what Scaleway Kosmos was built to solve.
First, What is Scaleway and Why "Sovereign Cloud" Matters?
Think of the cloud market like the car industry. You have the global giants (AWS, Google, Azure), and then you have regional specialists who understand local roads, regulations, and needs intimately. Scaleway is that European specialist.
A Sovereign Cloud prioritizes data locality, privacy, and compliance with local regulations like Europe's GDPR. It's about control—knowing your data is stored and processed under a specific legal framework, insulated from foreign legal reach. For European businesses, this isn't just a feature; it's a necessity.
Scaleway operates multiple availability zones across Europe, offering high-performance infrastructure—from bare metal servers to AI-optimized GPU clusters—all powered by renewable energy with transparent pricing.
So, What Makes Kosmos Different?
Kosmos is Kubernetes that thinks beyond borders.
Traditional managed Kubernetes services like Amazon's EKS or Azure's AKS are fantastic, but they create "walled gardens." Your clusters are confined to their infrastructure. Need that powerful GPU instance from another cloud? You're looking at complex workarounds.
Kosmos breaks this mold. It's a multi-cloud and hybrid Kubernetes engine from its core, with one superpower: seamlessly managing worker nodes across different environments.
You can run:
- Internal nodes: Scaleway's own virtual instances.
- External nodes: AWS EC2 or Google Cloud Compute Engine, or even your own on-premise servers—without extra charges
One control plane to rule them all. No vendor lock-in.
How Does It Work? The Architecture in Action
Let me paint a picture. Imagine deploying a web application where some components run on Scaleway and others on AWS EC2 or Google Compute Engine,, all managed as one unified cluster.
The Journey from Zero to Multi-Cloud
Step 1: Create the Brain – The Kosmos Cluster
You start by creating a Kosmos cluster in Scaleway's console. This provisions the control plane—your cluster's brain—responsible for scheduling and managing state. This battle-tested control plane has been running since 2019. Starting from Kubernetes version 1.25 launch, Kosmos only supports kilo as CNI.
Step 2: Add the Muscle – Internal and External Nodes
Now comes the magic. You create node pools:
- Internal Pool: Scaleway VMs with auto-scaling and auto-healing built in
- External Pool: Run the provided installation script on your compute instances (EC2 or Azure VM or any server), and they become native workers in your cluster.
Two notes while running the script on external VMs
i) Due to the deprecation of legacy Kubernetes packages, this script cannot be run on Ubuntu versions older than 24.04. Running it on older versions will result in an error like: "The repository 'http:// apt.kubernetes.io kubernetes-xenial Release' no longer has a Release file."
ii) The scripts install and runs kubelet behind the scnerio and it will fail to run properly on micro instances like t3.micro (EC2) or e2.micro (Google Compute Engine) where the memory is less than 2 GB.
Step 3: Package Your App – Push Container Images
Build your Docker image and push it to Scaleway's Container Registry. Authenticate, tag, upload—now all your nodes can pull your application, regardless of where they live.
Step 4: Take Control – Connect with kubectl
Download your cluster's kubeconfig file from Scaleway's console. This is your secure access badge. Now every kubectl command on your laptop talks directly to your Kosmos control plane.
Step 5: Deploy – Apply Kubernetes Manifests
Write your YAML manifest defining your deployment. Apply it with kubectl. The control plane intelligently schedules your pods across all available nodes—Scaleway, AWS, wherever. You don't have to care about the specifics; Kosmos handles it.
Step 6: Go Live – Create the Load Balancer
Define a LoadBalancer service in your K8s manifest. Scaleway automatically provisions it with a public IP address. Traffic flows from users → Load Balancer → Your pods (running anywhere in your multi-cloud setup).
The Big Picture
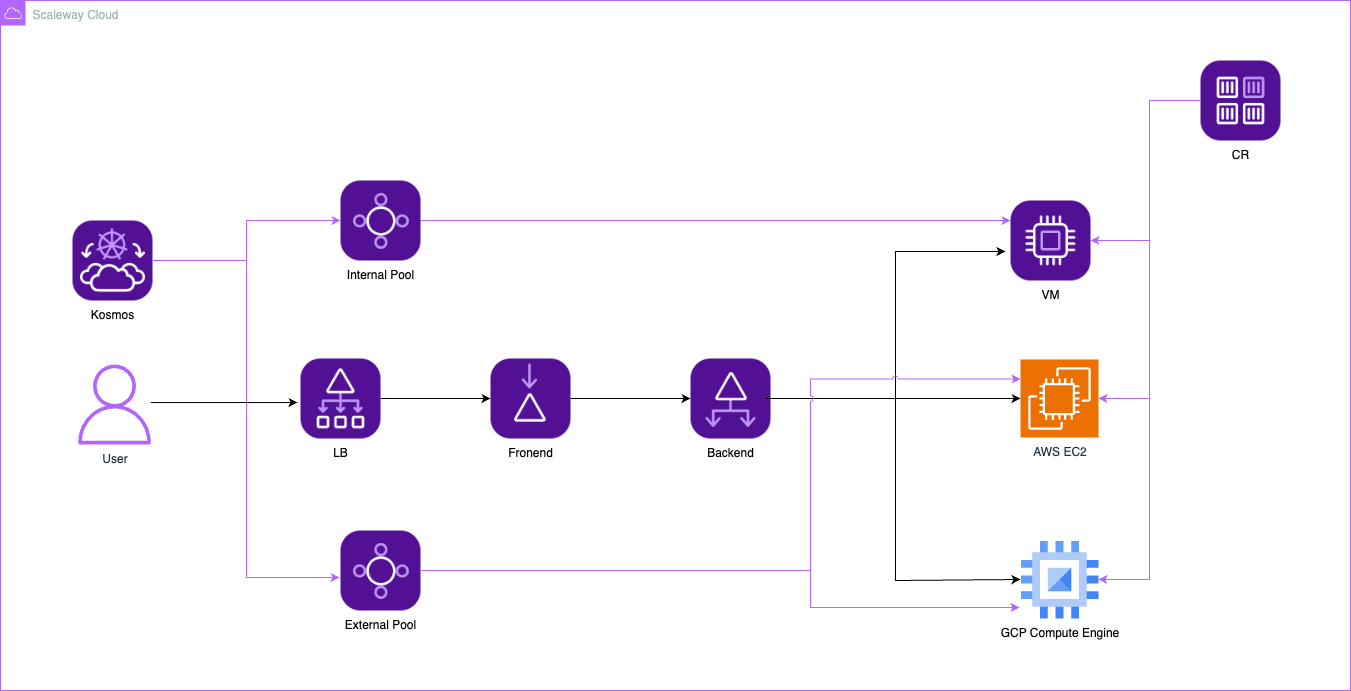
Scaleway Kosmos Architecture Diagram
Your user hits the load balancer. Traffic routes to healthy pods—whether they're on a Scaleway VM or an AWS EC2 instance. One seamless, fast, reliable application.
You've achieved:
- Workload portability: Move applications between clouds effortlessly
- Cost optimization: Leverage the best pricing from each provider
- High availability: Span multiple zones, regions, and clouds
- No vendor lock-in: Keep your options open
Why This Matters
In an era where data control and flexibility are paramount, Kosmos offers a practical path forward. You're not just building for today—you're building for a hybrid, multi-cloud future where compliance meets innovation.
Want to try it yourself? I've automated the entire setup using Terraform. Check out the GitHub repository here: [scaleway-kosmos]
What's your take on the future of multi-cloud Kubernetes? Let me know in the comments!
Resources: