Isolated GPU Nodes on Demand: Implementing vCluster Auto Nodes for AI Training on GKE
veröffentlicht am 28.01.2026
von
Jannis Schoormann
Learn how to provision isolated GPU nodes on demand for multi-tenant AI training on GKE. This tutorial implements vCluster Auto Nodes with Private Nodes, giving each tenant dedicated Compute Engine VMs that spin up automatically and terminate when workloads complete. Cost-efficient GPU isolation without managing separate clusters.
The Problem
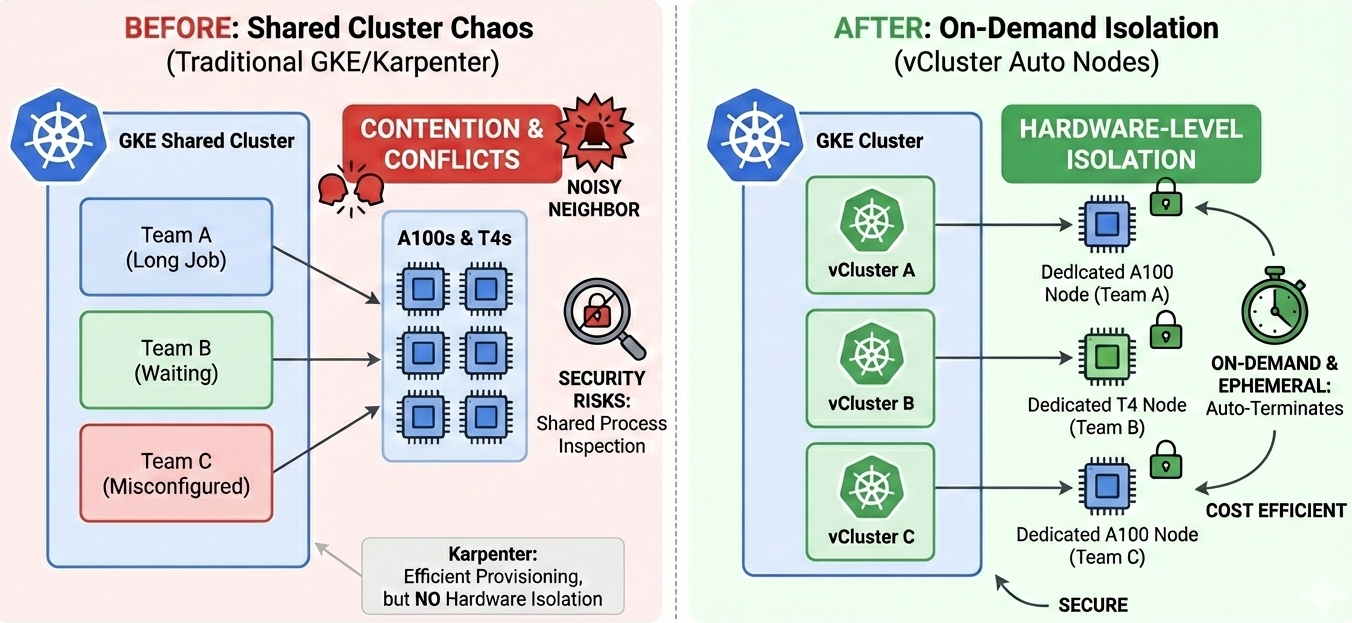
Your data science teams are fighting over GPUs. Three teams share a GKE cluster and are all competing for the same pool of A100s and T4s with which to train their models. One team's long-running job is using almost all resources, leaving the others to wait. Even worse, you are experiencing noisy neighbour effects: a misconfigured workload is consuming all GPU memory and crashing neighbouring pods. Security reviews have revealed that teams can inspect each other's processes on shared nodes. Scheduling becomes unpredictable, and your ML engineers end up waiting around more than they spend time training.
Traditional GKE approaches force you to make uncomfortable trade-offs. While dedicated node pools per team guarantee isolation, they also leave expensive GPUs sitting idle between jobs. Namespace isolation provides logical separation, but offers nothing at the hardware level. GKE Autopilot streamlines operations, but restricts the GPU configurations and node customizations required by ML workloads.
So, what about Karpenter? You might think it solves this problem, and it does handle dynamic node provisioning brilliantly. However, Karpenter alone does not address the multi-tenancy challenge. Nodes provisioned by Karpenter still belong to the shared host cluster. All tenants can potentially schedule workloads onto them. Teams can still inspect each other's processes, and a misconfigured job can still affect neighbouring processes on the same node. Karpenter provides efficiency, but not isolation.
What we need is both: the cost efficiency of on-demand GPU provisioning and hardware-level tenant isolation. GPU nodes that spin up automatically when a tenant submits a job, belong exclusively to that tenant, and terminate the moment the job completes. No idle resources, no shared hardware, no scheduling conflicts.
This is exactly what vCluster Auto Nodes delivers. In this guide, we will implement on-demand GPU isolation on GKE, step by step, to give each tenant their own dedicated computing resources, without the overhead of managing separate clusters. By the end of this tutorial, you will have a fully functional vCluster environment that automatically provisions and terminates dedicated GPU nodes on demand.
How vCluster Auto Nodes Works on GKE
We've established what we need: on-demand GPU provisioning with hardware-level tenant isolation. This is the advantage offered by the combination of Auto Nodes and Private Nodes, which sets it apart from Karpenter alone.
With standard Karpenter, newly provisioned nodes join the host cluster and remain accessible to all tenants, but vCluster flips this model. Private Nodes are Compute Engine VMs dedicated to your vCluster, rather than the host cluster. Each tenant's GPU workloads execute on completely separate hardware with no shared kernel or GPU drivers and no noisy neighbours. This is hardware-level isolation, not just namespace boundaries.
Auto Nodes provides the Karpenter-style intelligence that makes this economically viable. When you submit a GPU workload, Karpenter detects the unschedulable pod and creates a NodeClaim that specifies the required resources. The vCluster platform then intercepts this claim and triggers the GCP Node Provider, which provisions a Compute Engine VM with the appropriate GPU type. The new VM boots up via Cloud-Init and joins your vCluster as a dedicated worker node. Your pod is scheduled within seconds of the node becoming ready.
Crucially, the nodes terminate automatically once the workloads have finished. For A100 instances costing $3+ per hour, this transforms GPU provisioning into an on-demand utility. You benefit from Karpenter's scheduling expertise combined with true multi-tenant isolation.
In terms of networking, vCluster uses Konnectivity to connect the control plane with the worker nodes. The nodes establish secure outbound connections to the vCluster API server (exposed via LoadBalancer), which enables you to use kubectl commands without requiring direct network access. No VPC peering or firewall changes are needed.
Now that you understand the provisioning architecture, let's build it.
Prerequisites
Before starting, ensure you have the following tools and access:
GCP project with GPU quota approved for your target region
GKE Cluster Setup
📋 Before You Begin: GPU quota requests in GCP can take 24-48 hours to process. If you haven't already, request GPU quota for your target region before starting this tutorial to avoid delays when testing GPU workloads.
Before provisioning GPU nodes automatically, you need a properly configured GKE foundation. All configuration files referenced in this tutorial are available in the Liquid-Reply/vCluster-Demo repository. Clone it now to follow along:
git clone https://github.com/Liquid-Reply/vCluster-Demo.git
cd auto-nodes
Start by defining the environment variables that subsequent commands will reference throughout this tutorial:
These variables establish your GCP project context, cluster naming, and the service account mappings required for Workload Identity bindings later. Adjust LOCATION to a region with available GPU quota for your target instance types.
Next, enable the GCP APIs that power the Auto Nodes provisioning chain. The Container API manages GKE itself, while Compute enables VM creation for private nodes. IAM and Cloud Resource Manager handle the service account permissions, and Service Usage allows the platform to verify API availability programmatically.
We're creating a GKE Standard cluster rather than Autopilot intentionally. Autopilot's managed node lifecycle conflicts with Private Nodes—vCluster needs direct control over Compute Engine VMs that join the virtual cluster, which Autopilot's abstraction prevents. The --workload-pool flag enables Workload Identity, allowing Kubernetes service accounts to authenticate to GCP APIs without static credentials.
With your cluster running, install vCluster Platform:
vcluster platform start
This command deploys the platform components into your cluster and launches the configuration UI. Once complete, verify the deployment by checking that pods in the vcluster-platform namespace reach Running status. The platform controller you've just installed will orchestrate all subsequent GPU node provisioning.
Configuring IAM and Workload Identity
For vCluster Platform to provision Compute Engine VMs on your behalf, it needs authenticated access to GCP APIs. Workload Identity provides this access without the security risks of static service account keys. Instead, your Kubernetes service account maps directly to a GCP service account, letting Platform pods authenticate natively through GKE's identity federation.
We'll follow the principle of least privilege by creating a custom IAM role with only the permissions Auto Nodes requires. The auto_nodes_role.yaml file from the repository defines these permissions precisely—Compute Engine instance management, network access, and the ability to attach service accounts to provisioned nodes.
# Create custom IAM role
gcloud iam roles create vClusterPlatformAutoNodes \
  --project=$PROJECT_ID --file=auto-nodes-role.yaml
Next, create the GCP service account and establish the Workload Identity binding. This three-step process connects your Kubernetes service account (loft in the vcluster-platform namespace) to a GCP service account that holds the custom Auto Nodes role.
The final annotation completes the identity chain. When Platform pods make GCP API calls, GKE automatically exchanges the Kubernetes token for GCP credentials scoped to your service account.
Verify your IAM configuration is correct before proceeding:
gcloud iam service-accounts get-iam-policy $GSA_EMAIL
You should see the workloadIdentityUser role bound to your Kubernetes service account.
Finally, apply the node provider configuration that tells vCluster Platform how to provision GCP resources.
kubectl apply -f node-provider.yaml
The node provider configuration defines the available node types that Auto Nodes can provision.
Each nodeType entry maps a logical name to a specific Compute Engine instance configuration. The resources block declares the information that Kubernetes recognizes (CPU, memory and GPU count), while the properties specify the actual GCP instance parameters. Note that the GPU node type includes 'nvidia.com/gpu: 1' in the 'resources' field and references 'nvidia-tesla-t4' as the accelerator. This is how Karpenter matches GPU resource requests to the correct instance type. You can add additional node types for A100s, L4s or other GPU configurations by following this pattern.
Deploying vCluster and Testing GPU Workloads
With IAM configured and Workload Identity bound, you're ready to create your isolated GPU environment. The following command creates a new vCluster with Private Nodes enabled.
Once connected, your kubectl context switches to the vCluster. Every command from this point forward targets your isolated environment, completely separated from other tenants on the same GKE cluster.
Next, install the NVIDIA GPU Operator to manage GPU resources within your vCluster. First, add the NVIDIA Helm repository, then install the operator. We disable the driver installation because your node images will include pre-installed NVIDIA drivers.
Now for the moment of truth. The following commands deploy a GPU workload and let you watch Auto Nodes in action. The pod initially enters a Pending state because no GPU nodes exist yet. Karpenter detects the unschedulable pod, triggers the GCP Node Provider, and a Compute Engine VM with your specified GPU configuration spins up automatically.
# Deploy GPU workload and watch Auto Nodes
kubectl apply -f gpu-workload.yaml
kubectl get pods -w
kubectl get nodes  # Watch for auto-provisioned GPU node
A quick note on the test workload: the gpu-workload.yaml is a simulation of an AI job, not an actual GPU computation. It verifies GPU access via nvidia-smi, reports driver and memory information, then uses sleep commands to mimic model loading and inference batches. For production workloads, you'd use real ML frameworks like PyTorch or TensorFlow. The GPU resource configuration remains identical.
Within 3-5 minutes, you'll see a new node appear in kubectl get nodes. The pod schedules onto this node, runs your GPU workload, and when complete, the node automatically terminates. No manual intervention, no wasted resources, complete tenant isolation.
Key Takeaways and Next Steps
You have now implemented a powerful solution: the simplicity of a single GKE cluster combined with the isolation of dedicated clusters for expensive GPU workloads. This architecture eliminates the operational overheads associated with managing multiple clusters, while providing the hardware-level separation required for multi-tenant AI training.
Let's recap what we built. Workload Identity provides keyless authentication between the vCluster Platform and GCP APIs. Karpenter-powered Auto Nodes provision GPU instances only when workloads require them. Private Nodes ensure complete tenant isolation so that each team's training jobs run on dedicated Compute Engine VMs that no other tenant can access.
Before scaling to production, there are a few considerations to address. Request sufficient GPU quota in your target regions well ahead of time. Configure disruption policies to balance cost savings against interruptions to training jobs. The DCGM exporter that we installed feeds GPU metrics into your existing monitoring stack for utilization tracking.