
Deploy an infrastructure stack on AWS that provides certificate-based encryption, based on Cert-Manager, Kubernetes Gateway API, and External-DNS.
veröffentlicht am 13.01.2025 von Marten Wick
Establishing a secure connection between a client and a webserver is essential to protect a user session against access or manipulation by third parties. If a web application should be reachable via the public internet, it needs to provide a certificate, that is from a trusted authority so most web browsers should trust the server behind the web address by default. A free solution represents the combination of the tool “cert-manger” and the nonprofit Certificate Authority “Let’s Encrypt” which provides an automatic way to request and deploy valid certificates into applications.
General
Versions used in this document
| Application/Resource | Version |
| External-DNS | Chart version: 1.14.5 App version: 0.14.2 |
| Nginx-Gateway-Fabric | Chart version: 1.4.0 App version: 1.4.0 |
| Cert-Manager | Chart version: 1.15.3 App version: 1.15.3 |
| Kubectl | v1.24.2 |
| Helm | v3.11.1 |
| AWS CLI | v2.7.9 |
| EKS | v1.29 |
Cert-manger
Cert-manager is an open-source project in the CNCF (Cloud Native Computing Foundation) landscape. It is used to automate the issuance, renewal, and revocation of TLS certificates within Kubernetes clusters. Cert-manager supports various validation methods, such as HTTP, DNS, and TLS-based validation.
More information can be found in the official documentation.
External-DNS
External-DNS is an open-source tool for Kubernetes that manages the DNS entries based on the cluster's Services, Ingress and Gateway APIs resources. It connects Kubernetes with DNS providers such as AWS Route 53, Google Cloud DNS, Azure DNS and others to update the entries there dynamically. External-DNS enables developers to create and update DNS entries for their applications without any manual intervention.
More information can be found in the official documentation.
Let’s Encrypt
Let's Encrypt is a nonprofit, automated, and open certificate authority that provides digital certificates that can be used to encrypt HTTP connections for websites. Founded in 2016 the goal is to make HTTPS encryption more accessible and widespread on the internet. The issued certificates are valid for 90 days and can be automatically renewed. Let's Encrypt is a simple and cost-effective way to enhance the security of web applications.
Automatic Certificate Management Environment
We will use the Automatic Certificate Management Environment (ACME) protocol to issue new certificates from Let’s Encrypt for our Kubernetes cluster.
There are two steps to this process:
- The agent proves that it controls the domain to the CA.
- After the initial validation, certificates for that domain can be requested, renewed, and revoked by the agent.
Domain validation
The CA will query the agent to solve a challenge in the first step. This could be one of the following:
- Provisioning a DNS record under example.com
- Provisioning an HTTP resource under a well-known URI on http://example.com/
In this example, we will stick to the second challenge:

In this case, the agent
- creates a file on the path “http://example.com/8303” with the content “ed98”
- signs the provided nonce with its private key
Once the agent is done, it notifies the CA that it is ready for validation.
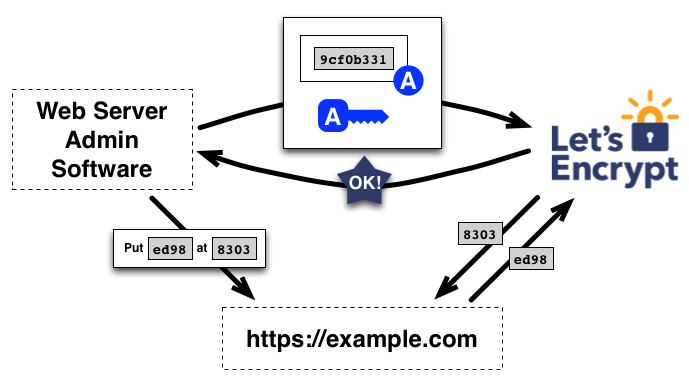
The CA verifies that the signature was done with the corresponding private key to the public one it received from the domain before and that the content of the downloaded file from the requested path is correct.
If so, the domain agent is ready to request certificates from the CA.
Certificate Issuance
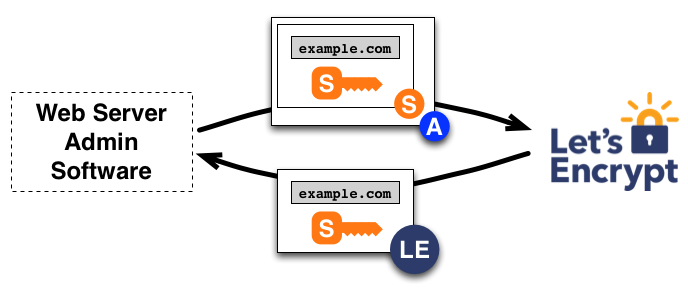
To receive a valid signed certificate, the following steps must be performed:
- The agent is creating a PKCS#10 Certificate Signing Request (CSR) for the domain “example.com” containing the public key. It also includes a signature from the private key corresponding to the public key in the CSR
- The whole CSR is then signed with the private key that was authorized in the domain validation step before.
- When the CA receives the request, both signatures are verified.
- If everything is correct, the CA will issue a certificate from the domain “example.com” with the public key of the CSR and send it back to the agent.
Certificate revocation
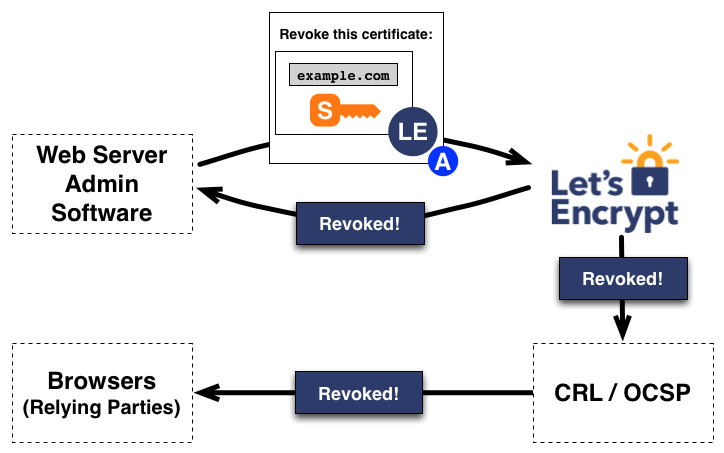
If for some reason the certificate needs to be revoked, the agent sends a signed (with the authorized private key) revocation request to the CA. If the CA can validate this request, it takes care to publish the revocation information through CRLs or OCSP.
Ingress
Ingress is an API resource that defines HTTP and HTTPS routes to expose services in the cluster to the outside world.

Data flow:
- Client request
- A Client sends an HTTP(S) request to the IP address/hostname of the Ingress controller.
- Ingress controller
- The Ingress controller receives the request from the client and checks the configured ingress resources to determine where it will be forwarded to.
- Service
- Depending on the rules (for example hostname and path) the Ingress controller forwards the request to the responsible service.
- Backend
- The service will forward the request to the pods that are running the requested application.
Gateway API
The Gateway API is the successor and an enhancement of the Ingress model. It provides a comprehensive and flexible model for defining network access policies.

Data flow:
- Client request
- A Client sends an HTTP(S) request to the IP address/hostname of the Gateway.
- Gateway
- A gateway controller receives the request and processes it according to the defined routing rules configured in gateway resources.
- Route
- The request will be forwarded to the responsible route that has the matching services defined.
- Service
- The matching service will receive the request.
- Backend
- The service will forward the request to the pods that are running the requested application.
Ingress vs Gateway API
Limitation of Ingress
The ingress resources main limitation is that it only works at layer 7, optimized for HTTP and HTTPS traffic. Protocols like gRPC (also layer 7) and those that are not operating at layer 7 must be handled by custom controller extensions rather than native Ingress capabilities. This results in fragmentation if additional features, for example, authentication or rate-limiting policies are required. These additionally need platform-specific (different syntax and set) annotation to configure them, which will end up vendor-locked rather than portable.
Solutions from Gateway API
As the Gateway API is the successor, it will replace the ingress resource in future Kubernetes versions and fix its limitations. A compliant gateway must support a defined common set of resource objects and usage patterns that the Gateway API defines. This enables the cluster to choose between a variety of gateway implementations without a high amount of migration expense. At the moment, Layer 4 and 7 protocols such as TCP, UDP, HTTP and gRPC are supported, more are under consideration.
The Gateway API brings some new objects to the cluster:
- GatewayClass
- for defining controller capabilities.
- Gateway
- for instantiating network gateways with those capabilities.
- HTTPRoute
- for defining HTTP routes to the backend.
Gateway API is designed to be easily extended and customized to specific needs. It enables the introduction of new features and standards without having to significantly revise existing implementations.
Deployment and configuration
Before we can start with the deployment of the main tools of this document, we need some prerequisites in place:
A running EKS (Elastic Kubernetes Service) cluster on AWS
- A registered domain on AWS Route53
- Tool Helm installed on your local machine
Note (AWS Route53): You need to make sure that the nameservers on the registered domain match the entries on the hosted zone. Otherwise, the name resolution will fail.
Setup External-DNS and Gateway API CRDs
Because the CRDs are at the moment not by default deployed on a freshly created Kubernetes cluster, so we need to do manually:
$ kubectl apply -f https://github.com/kubernetes-sigs/gateway-api/releases/download/v1.1.0/standard-install.yaml
customresourcedefinition.apiextensions.k8s.io/gatewayclasses.gateway.networking.k8s.io created
customresourcedefinition.apiextensions.k8s.io/gateways.gateway.networking.k8s.io created
customresourcedefinition.apiextensions.k8s.io/grpcroutes.gateway.networking.k8s.io created
customresourcedefinition.apiextensions.k8s.io/httproutes.gateway.networking.k8s.io created
customresourcedefinition.apiextensions.k8s.io/referencegrants.gateway.networking.k8s.io created
Before deploying External-DNS to the cluster, we must create an AWS IAM service account that associates the Kubernetes service account with an AWS IAM role. This is necessary to provide access to the DNS hosted zone. The policy that will be attached to the service account, named “external-dns-policy”, is as follows:
{
  "Version": "2012-10-17",
  "Statement": [
      {
          "Sid": "VisualEditor0",
          "Effect": "Allow",
          "Action": "route53:ChangeResourceRecordSets",
          "Resource": [
              "arn:aws:route53:::hostedzone/<hosted zone id>"
          ]
      },
      {
          "Sid": "VisualEditor1",
          "Effect": "Allow",
          "Action": [
              "route53:ListHostedZones",
              "route53:ListResourceRecordSets",
              "route53:ListTagsForResource"
          ],
          "Resource": "*"
      }
  ]
}
And is created via the AWS CLI tool:
$ aws iam create-policy --policy-name external-dns-policy --policy-document file://manifests/iam/ExternalDNS_permissions.jsonAfter the policy is in place, we can trigger the creation of the AWS IAM service account:
$ eksctl create iamserviceaccount --name external-dns --namespace default --cluster testcluster-1 --attach-policy-arn arn:aws:iam::<account-id>:policy/external-dns-policy --approve --override-existing-serviceaccounts
2024-09-03 09:18:24 [ℹ]  1 iamserviceaccount (default/external-dns) was included (based on the include/exclude rules)
2024-09-03 09:18:24 [!]  metadata of serviceaccounts that exist in Kubernetes will be updated, as --override-existing-serviceaccounts was set
2024-09-03 09:18:24 [ℹ]  1 task: {
    2 sequential sub-tasks: {
        create IAM role for serviceaccount "default/external-dns",
        create serviceaccount "default/external-dns",
    } }2024-09-03 09:18:24 [ℹ]  building iamserviceaccount stack "eksctl-testcluster-1-addon-iamserviceaccount-default-external-dns"
2024-09-03 09:18:24 [ℹ]  deploying stack "eksctl-testcluster-1-addon-iamserviceaccount-default-external-dns"
2024-09-03 09:18:24 [ℹ]  waiting for CloudFormation stack "eksctl-testcluster-1-addon-iamserviceaccount-default-external-dns"
2024-09-03 09:18:55 [ℹ]  waiting for CloudFormation stack "eksctl-testcluster-1-addon-iamserviceaccount-default-external-dns"
2024-09-03 09:18:55 [ℹ]  created serviceaccount "default/external-dns"
In the next step, we will deploy the Helm chart of External-DNS. We need to set the source to “gateway-httproute” to enable the tool to handle Gateway API resources. It is also necessary to specify the domain that will be managed and the owner of the DNS entries.
$ helm repo add external-dns https://kubernetes-sigs.github.io/external-dns/
$ helm upgrade --install external-dns external-dns/external-dns --namespace default --version 1.14.5 \
    --set sources[0]="gateway-httproute" \
    --set infoblox.domainFilter="liquidtest.click" \
    --set txtOwnerId="external-dns"
Release "external-dns" does not exist. Installing it now.
NAME: external-dns
LAST DEPLOYED: Tue Sep  3 09:13:15 2024
NAMESPACE: default
STATUS: deployed
REVISION: 1
TEST SUITE: None
NOTES:
***********************************************************************
* External DNS                                                        *
***********************************************************************
  Chart version: 1.14.5
  App version:   0.14.2
  Image tag:     registry.k8s.io/external-dns/external-dns:v0.14.2
***********************************************************************
After the deployment is performed and the application is up and running, we can check the logs if everything is fine:
[…]
time="2024-09-05T12:05:56Z" level=info msg="Applying provider record filter for domains: [liquidtest.click. .liquidtest.click.]"
time="2024-09-05T12:05:56Z" level=info msg="All records are already up to date"
[…]
No issues are logged, and it was already checked, if the domain records have to be updated.
Deploy Nginx gateway controller
In this document, we will use Nginx as the gateway controller. The deployment is simply performed via Helm:
$ helm upgrade --install ngf oci://ghcr.io/nginxinc/charts/nginx-gateway-fabric --namespace nginx-gateway --version 1.4.0\
  --create-namespace
Release "ngf" does not exist. Installing it now.
Pulled: ghcr.io/nginxinc/charts/nginx-gateway-fabric:1.4.0
Digest: sha256:9bbd1a2fcbfd5407ad6be39f796f582e6263512f1f3a8969b427d39063cc6fee
NAME: ngf
LAST DEPLOYED: Tue Sep  3 09:22:34 2024
NAMESPACE: nginx-gateway
STATUS: deployed
REVISION: 1
TEST SUITE: None
Done, nothing more to do!
Setup Cert-Manager
For the deployment of Cert-Manager via Helm, it is important to set the value of “config.enableGatewayAPI” to true, so it will be able to use Gateway API objects to accomplish Let’s Encrypt challenges to get certificates signed via the ACME protocol.
$ helm repo add jetstack https://charts.jetstack.io
$ helm upgrade --install cert-manager jetstack/cert-manager --namespace cert-manager --version 1.15.3 \
  --set config.apiVersion="controller.config.cert-manager.io/v1alpha1" \
  --set config.kind="ControllerConfiguration" \
  --create-namespace \
  --set crds.enabled=true \
  --set config.enableGatewayAPI=true
Release "cert-manager" does not exist. Installing it now.
NAME: cert-manager
LAST DEPLOYED: Tue Sep  3 09:24:09 2024
NAMESPACE: cert-manager
STATUS: deployed
REVISION: 1
TEST SUITE: None
NOTES:
cert-manager v1.15.3 has been deployed successfully!

In order to begin issuing certificates, you will need to set up a ClusterIssuer
or Issuer resource (for example, by creating a 'letsencrypt-staging' issuer).

More information on the different types of issuers and how to configure them
can be found in our documentation:

https://cert-manager.io/docs/configuration/

For information on how to configure cert-manager to automatically provision
Certificates for Ingress resources, take a look at the `ingress-shim`
documentation:

https://cert-manager.io/docs/usage/ingress/
Deployment of the Gateway resources
After the Cert-Manager is in place, we can proceed with the deployment of the backend example application and the Gateway API resources. Let's have a look at the manifests first, before deploying:
ClusterIssuer.yaml
apiVersion: cert-manager.io/v1
kind: ClusterIssuer
metadata:
  name: letsencrypt-staging
spec:
  acme:
    email: <email address>
    server: https://acme-staging-v02.api.letsencrypt.org/directory
    privateKeySecretRef:
      name: letsencrypt-staging
    solvers:
      - http01:
          gatewayHTTPRoute:
            parentRefs:
            - kind: Gateway
              name: acme-gateway-staging
              namespace: default
Important values to be configured:
- spec.acme.server: specify the server of the CA that will be used to issue the certificates for the cluster. In this case, we will use the staging environment of Let’s Encrypt because we will have more flexibility in case of testing around with certificates.
- spec. privateKeySecretRef.name: Name of the secret where the authorized private key will be stored.
- spec.acme.solvers[0].http01.gatewayHTTPRoute.parentRefs: reference to the Gateway resource that will be used to accomplish the challenge from the CA.
Gateway.yaml
apiVersion: gateway.networking.k8s.io/v1
kind: Gateway
metadata:
  name: acme-gateway-staging
  annotations:
    cert-manager.io/cluster-issuer: letsencrypt-staging
spec:
  gatewayClassName: nginx
  listeners:
    - name: http-listener
      port: 80
      protocol: HTTP
      allowedRoutes:
        namespaces:
          from: All
    - name: https-listener
      hostname: "staging.liquidtest.click"
      port: 443
      protocol: HTTPS
      allowedRoutes:
        namespaces:
          from: All
      tls:
        mode: Terminate
        certificateRefs:
          - name: acme-gateway-staging-certificate
            kind: Secret
            group:
Important values to be configured:
- metadata.annotations.cert-manager.io/cluster-issuer: the name of a ClusterIssuer to acquire the certificate required for this Gateway.
- spec.gatewayClassName: specify the name of the gatewayClass to be used.
- spec.listeners[0]: This is the first listener that will handle the traffic based on HTTP, port 80.
- spec.listeners[1]: The second listener is handling the encrypted traffic, based on HTTPS, port 443.
- spec.listeners[1].hostname: here is the domain name specified that the listener will handle the traffic for.
- spec.listeners[1].tls.mode: specifies how the Gateway will handle the incoming traffic. Possible configuration is
- Terminate: The Gateway is responsible for encrypting outgoing and decrypting incoming traffic. To do so, a valid certificate will be required.
- Passthrough: The Gateway will redirect the traffic to the responsible route/backend that will encrypt and decrypt the traffic by itself.
- spec.listeners[1].tls.certificateRefs: reference to the secret that contains the valid certificate of the domain.
HTTPRoute.yaml
apiVersion: gateway.networking.k8s.io/v1
kind: HTTPRoute
metadata:
  name: acme-httproute-staging
  namespace: default
spec:
  parentRefs:
    - name: acme-gateway-staging
  hostnames:
  - "staging.liquidtest.click"
  rules:
    - matches:
        - path:
            type: PathPrefix
            value: /test
      backendRefs:
      - name: coffee
        port: 80
Important values to be configured:
- spec.parentRefs: specifies the Gateway the route should be attached to.
- spec.hostnames: the domain the route receives traffic for. Must match the field “spec.listeners[1].hostname” in the gateway configuration to be accepted by the same.
- spec.rules[0].matches[0].path: can specify under which prefix the application is reachable.
- spec.rules[0].backendRefs[0]: specifies the backend service, where the requested application is reachable.
Deployment of the backend example application
Before the Gateway can start to operate, we need to setup the backend where the traffic will be redirected to.
Deployment.yaml
apiVersion: apps/v1
kind: Deployment
metadata:
  name: coffee
spec:
  replicas: 2
  selector:
    matchLabels:
      app: coffee
  template:
    metadata:
      labels:
        app: coffee
    spec:
      containers:
      - name: coffee
        image: nginxdemos/nginx-hello:plain-text
        ports:
        - containerPort: 8080
If the example application is called, it will return some connection details:
Server address: 10.0.1.118:8080
Server name: coffee-6b8b6d6486-pqs2c
Date: 05/Sep/2024:12:50:15 +0000
URI: /test
Request ID: bd70e3045c11627e60cbd51b343e3bd4
Service.yaml
apiVersion: v1
kind: Service
metadata:
  name: coffee
spec:
  ports:
  - port: 80
    targetPort: 8080
    protocol: TCP
    name: http
  selector:
    app: coffee
The service will receive the traffic from the Gateway and redirects them to the pods of the coffee Deployment.
Finally, we deploy all the mentioned manifests:
$ kubectl apply -f manifests/gateway-api/
$ kubectl apply -f manifests/application/
Review the cluster resources
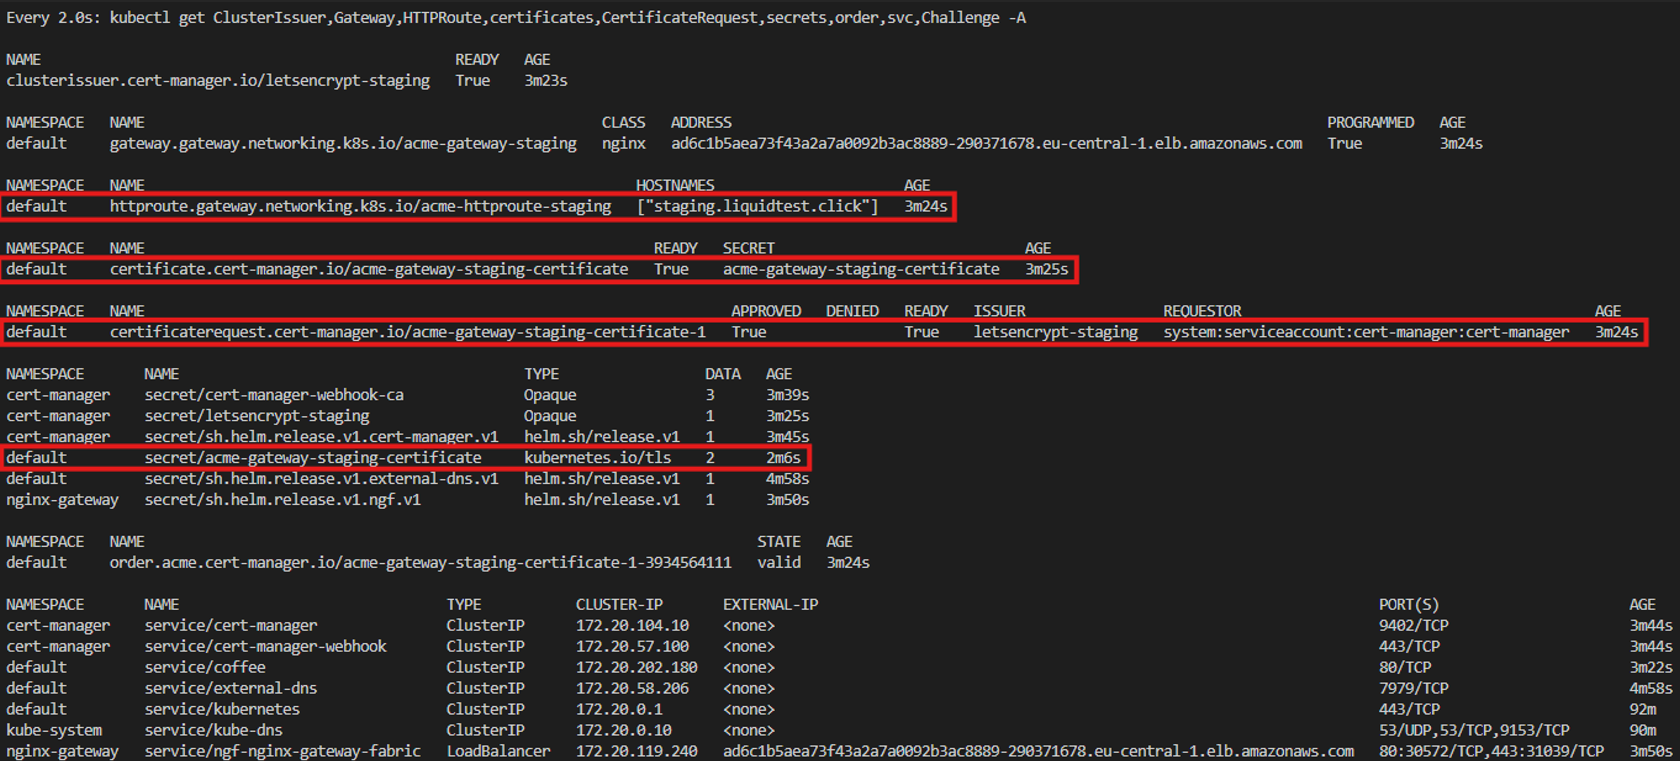
Right after all the Helm charts and manifests are deployed to the cluster, the overview will look like the following:
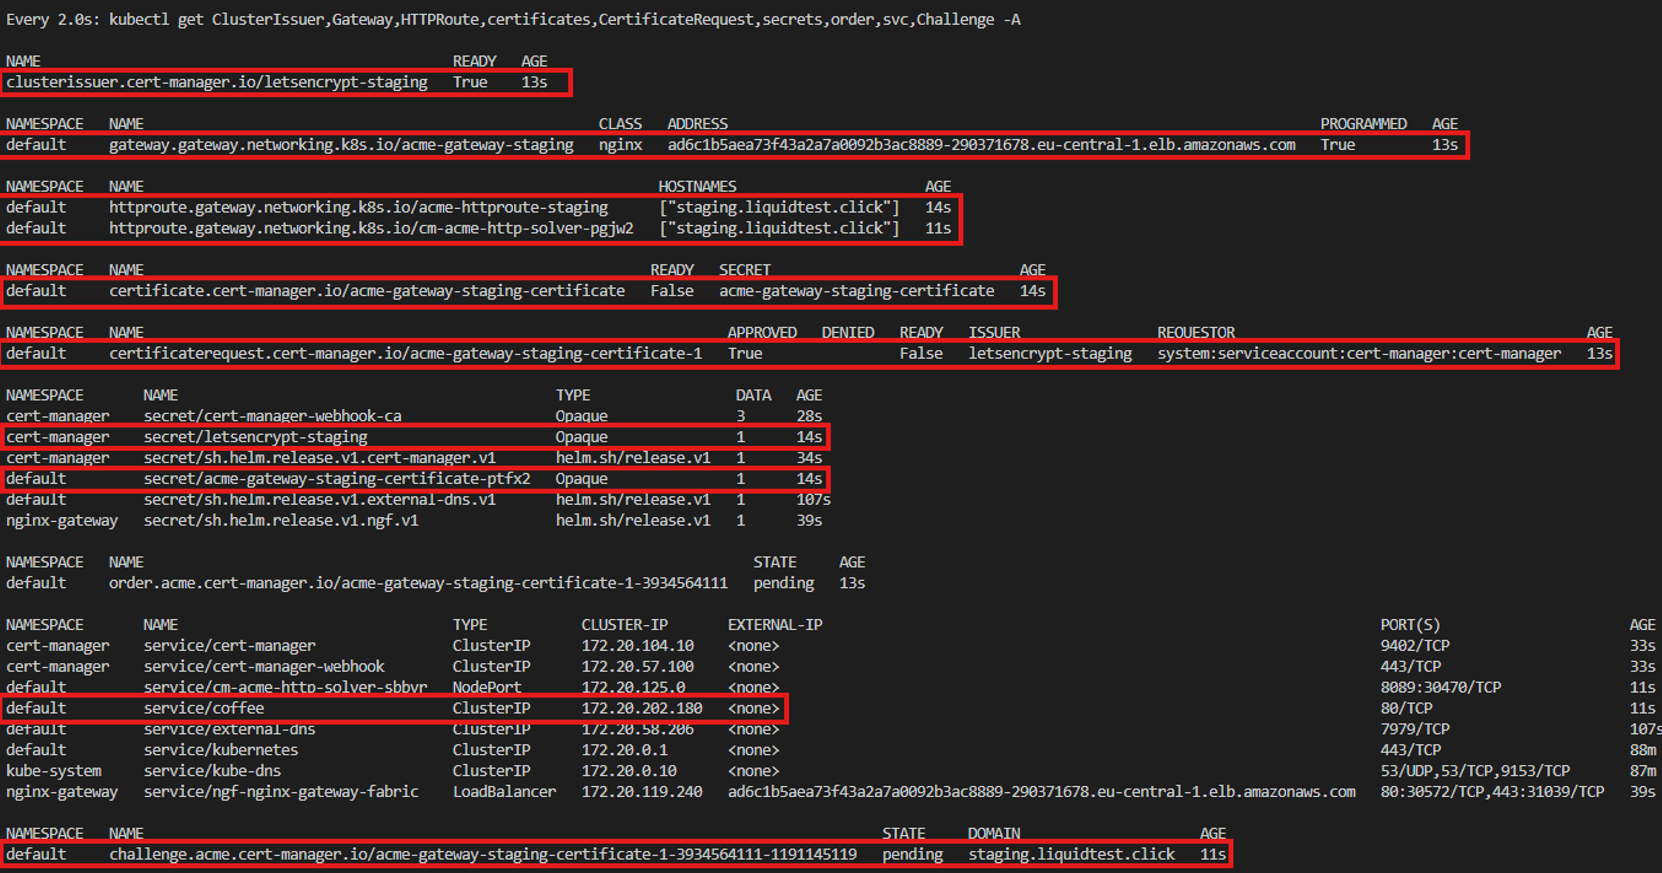
ClusterIssuer: The ClusterIssuer “letsencrypt-staging” is in place and ready.
Gateway: The Gateway is in place and ready.
CertificateRequest: The CSR for the Certificate that the Gateway will use.
Certificates: The object of the certificate that will be used by the Gateway, currently waiting for the CSR to be processed.
Secrets:
- letsencrypt-staging: Contains the private key that will be validated by the Let’s Encrypt CA.
- acme-gateway-staging-certificate-ptfx2: Contains the private key to the public key that will be used to generate the certificate for the domain “staging.liquidtest.click”
Order: The Order object represents an Order with an ACME server that also handles the creation of the challenge object. In this case, this is the Order of the Gateway certificate for the domain “staging.liquidtest.click”.
Challenge: This represents the challenge that the CA requested from the agent.
HTTPRoute: The route object “cm-acme-http-solver-pgjw2” is taking care to provide the file on the requested path from the ACME server to solve its challenge. The following screenshot shows the path and content of the challenge the CA requested for validation and is provided by the cluster:

Service: The coffee service represents the backend that will be called by the Gateway.
After some time, the challenge was completed, and the certificate was issued by the CA and pushed into the “acme-gateway-staging-certificate” secret alongside the corresponding private key. The second HTTPRoute object that was responsible for fulfilling the challenge was removed, and the Challenge object disappeared. Both, the CSR and the certificate itself are now ready, the latter one will be used for the encrypted communication between the client and the Gateway.
Now we can access the example application via the address “http://staging.liquidtest.click/test”, first without encryption with plain HTTP:

And second with encryption using the generated certificate via HTTPS (https://staging.liquidtest.click/test). Because we are using the staging environment of Let’s Encrypt, our browser will per default throw the error “SEC_ERROR_UNKNOWN_ISSUER”; The certificate issuer of the remote party was not recognized. This is because the staging CA root certificate is not implemented into the default certificate storage of most browsers, only the production one is typically implemented. After adding an exception for this certificate, we can proceed and access the application via an encrypted channel:

Conclusion
The combination of External-DNS, Cert-Manager and Gateway API enables the cluster to set the corresponding DNS entry and secure the communication to your application by issuing a valid certificate in a nearly fully automated way. The only responsibility that the developer has is to take care of the correct configuration of the HTTPRoute resource and/or the Gateway in case another domain is used for the application.
Sources:
- https://gateway-api.sigs.k8s.io/guides/
- https://kubernetes-sigs.github.io/external-dns/v0.14.2/tutorials/gateway-api/
- https://repost.aws/knowledge-center/eks-set-up-externaldns
- https://dev.to/ileriayo/adding-free-ssltls-on-kubernetes-using-certmanager-and-letsencrypt-a1l
- https://cert-manager.io/docs/usage/gateway/
- https://konghq.com/blog/engineering/gateway-api-vs-ingress
- https://letsencrypt.org/how-it-works/