
All articles
Kubernetes cost optimization on AWS
How to bring down the cost of Kubernetes microservices on AWS using EC2 auto-scaling, right-sizing and capacity planned on a schedule.
·
Marten Wick

Using EC2 auto scaling groups is one possibility to save costs on AWS. But this kind of scaling has some limitations that I want to show you in this blog post and provide you one solution. Also, the automated scaling of deployments that directly affects the required amount of nodes will be part of it.
The issue with EC2 auto-scaling groups
As I mentioned, some limitations exist with EC2 auto-scaling groups (EC2 ASG). If you want to use it, it is necessary to create a launch template that defines the size of each new node that will be spun up. Here we are facing some issues with the fixed capability of new members of the scaling group.
The new instance can be
undersized for the pod that needs to be executed
--> The application is not schedulable on the cluster
oversized for the pod that needs to be executed
--> The instance consumes more resources than needed. That will result in more costs at the end of the month.
The solution approach
And here is where Karpenter jumps in. It is an open source project started by AWS and is currently only available for AWS. Karpenter provides an intelligent way to scale your Kubernetes cluster to the right size at the right time.
What it does:
Watching for pods that the Kubernetes scheduler has marked as unschedulable
Evaluating scheduling constraints (resource requests, nodeselectors, affinities, tolerations, and topology spread constraints) requested by the pods
Provisioning nodes that meet the requirements of the pods
Removing the nodes when the nodes are no longer needed
(Source: https://karpenter.sh/v0.19.3/)
In conclusion, Karpenter will manage the size of the cluster in an intelligent and cost-saving way that will reduce the costs of the monthly cloud bill.
How to use Karpenter
Setup
Because the setup is pretty well described in the official documentation, please go through the steps on https://karpenter.sh/preview/getting-started/getting-started-with-eksctl/ to set up and prepare your test cluster. I will only look at the provisioners definition file and then jump over to the demonstration.
Provisioner and AWSNodeTemplate
The provisioner enables Karpenter to define and spin up new nodes for the cluster and the “AWSNodeTemplate” references the cluster subnet and security groups.
In the example above, the instances will be placed as spot instances. There are some more requirements that you can define in the provisioner YAML-file, such as a list of instance types to choose from (see more options on https://karpenter.sh/preview/c…). If you don’t define this list, Karpenter automatically chooses the right type for the pending pods. In addition, you can limit the size of the new node in the limits section, where you can define things like CPU or memory size. The “ttlSecondsAfterEmpty” value specifies the time in seconds after which an empty and no longer needed node will be terminated and removed from the cluster.
Usage
After we set up the prerequisites and Karpenter itself, we can use Karpenter to scale our test cluster. We will test the node provisioning and termination with a deployment that will force Karpenter to take action.
Node provisioning
First, the deployment will be created without any replicas. This will not influence the cluster workload and therefore, no new nodes are needed.
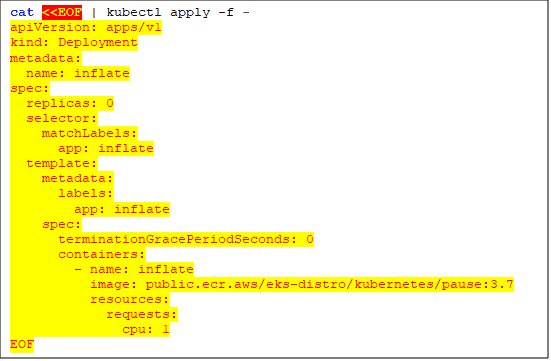

After we scale the deployment to 5, Karpenter will need to provision a new node to fit the new pods into.
Node Termination
There are two ways to terminate node instances from your Kubernetes cluster: automatic and manual.
The automatic termination will be performed from Karpenter itself after a node has no more workload to execute. If Karpenter detects an unused/empty node, it will terminate the node after the defined time (value of ttlSecondsAfterEmpty) in the provisioner definition file. For these details, we will take a look at the logs of the controller container in the Karpenter pod:

This worked great!
Let’s have a look at the manual node deletion. There could be the need to merge pods that are spread over multiple nodes into one. For demonstration purposes, I will simulate this scenario with deployment scaling so three additional nodes will be created. After everything runs, these new nodes will be removed, so Karpenter should merge all the pods to a larger single node.

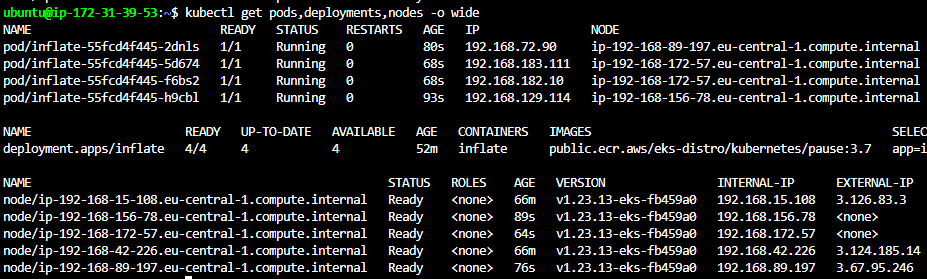
Because the scaling commands are executed with a small break between them, we now have three new additional nodes provisioned. As we can see in the controller logs, there are two new “large” and one “xlarge” nodes provided:



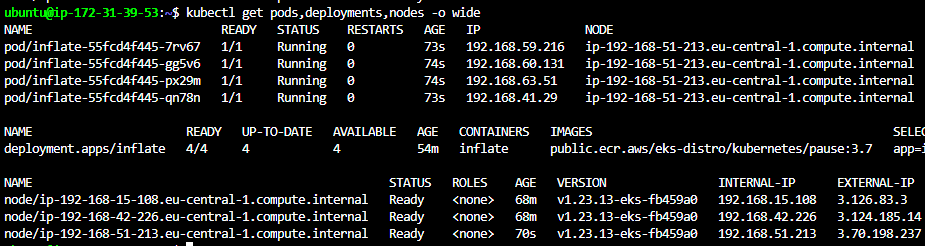
If we delete these nodes, Karpenter should be forced to spin up a new node for the pending pods.

After a short time, a new single node is provided. Checking the logs of the controller shows, that the new node is sized as a “2xlarge” instance type to handle the pending pods.
Getting started with kube-green
Automated scaling of deployments
As I already mentioned, the automated scaling of deployments is part of this blog post, so let’s try kube-green!
The main reason to scale deployments automatically is to catch known peak loads and save execution costs. kube-green is a tool to scale deployments and suspend cronjobs. The last one will not be part of here.
Setup kube-green
As a prerequisite, the cert manager needs to be in place on the cluster:

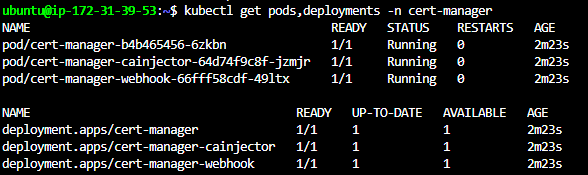
The setup of kube-green is a simple kubectl apply command that is executed in a couple of seconds.


After everything is up and running, kube-green is ready to use!
Handling
The configuration of kube-green is simple and only consists of one CRD called “SleepInfo”. This resource manages all deployments in the namespace where it was deployed.
Below we will have a look at the CRD structure:
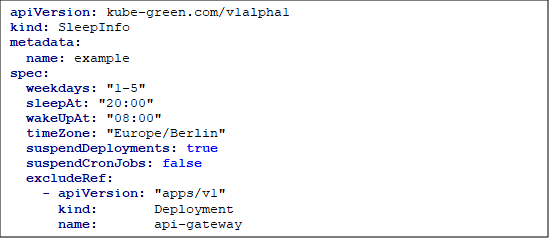
Example
For testing purposes, I created an example that will use the deployments in the default namespace from above (deployment “inflate”). Stopped at 11:19 and started again 2 minutes later.
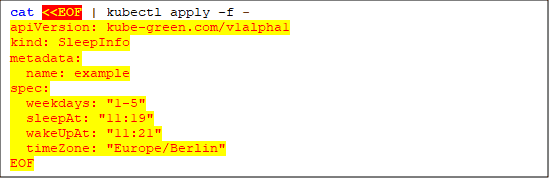
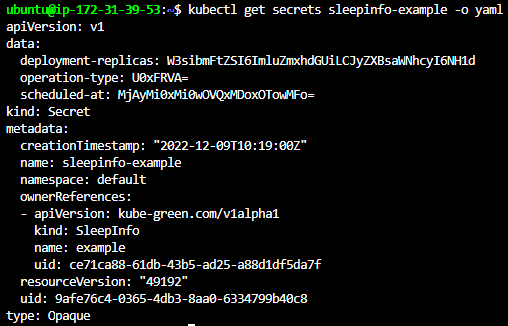
After the “SleepInfo” takes effect for the first time, there a secret is created that contains the last replication count and the name of the stopped deployment, as well as the last operation type and when it was scheduled.


As specified, two minutes later, kube-green restores the replication count of the deployment and removes the no longer needed “deployment-replicas” data object from the secret, saving the last operation type and when it was scheduled.
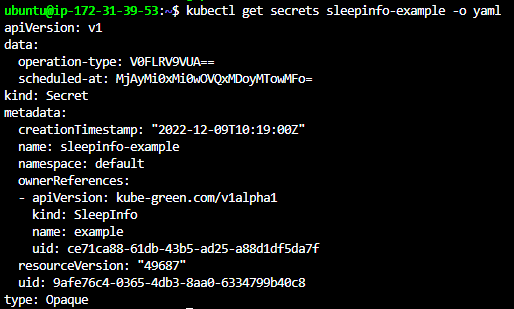

As we can see, the upscaling of the deployment was done successfully.
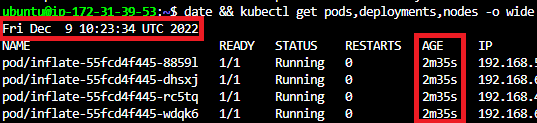
Combination of kube-green and Karpenter
The next step is obvious and consists of the combination of the two tools. When kube-green scales the deployments down, Karpenter will intervene and remove empty and unused nodes from the cluster.
Because this is the same procedure as the manual scaling in the Karpenter section, I will skip a deeper look at this topic. Believe me when I say that it worked pretty well in combination 😊
Share