
All articles
Sandboxing AI Agent Code on Amazon EKS with Kata Containers
AI agents execute code they generate, but how can we trust code nobody has reviewed? In this hands-on guide, we use Kata Containers and Agent Sandbox on Amazon EKS to run untrusted AI-generated code in isolated micro-VMs, without network access or credentials.
·
Jannis Schoormann

AI agents have moved from generating text to running code. A coding agent writes a script and runs it, a data analysis agent generates code and runs it on your files, and a research agent fetches a web page, parses it and follows the links it finds. In each case a model wrote the code a few seconds earlier. No human reviewed it, and any text the agent read along the way could have shaped it.
In this post I build an AI agent sandbox on Amazon EKS: an isolated execution environment for that code, built with Kata Containers and Agent Sandbox. Each sandbox gets its own lightweight virtual machine through Kata Containers, and Agent Sandbox, a Kubernetes SIG Apps project, manages its lifecycle. At the end, an LLM agent on your laptop runs code, shell commands and file operations inside a Kata VM and gets the results back. The VM has no network egress, no credentials and no Kubernetes token.
Why AI agents need sandboxes: running untrusted LLM-generated code
The classic container security model assumes you know what you're running: you built the image, scanned it and deployed it through a pipeline. Agent-generated code doesn't fit that model. The workload is created at runtime, it's different every time, and whoever wrote the text the agent consumed partly controls what it does.
A malicious instruction hidden in a web page, a GitHub issue, a PDF or a tool response can steer the model into writing code that reads environment variables, scans the network, queries the cloud metadata endpoint or sends data somewhere.
That leads to a simple threat model: assume the code in the sandbox is hostile, and ask what it can reach.
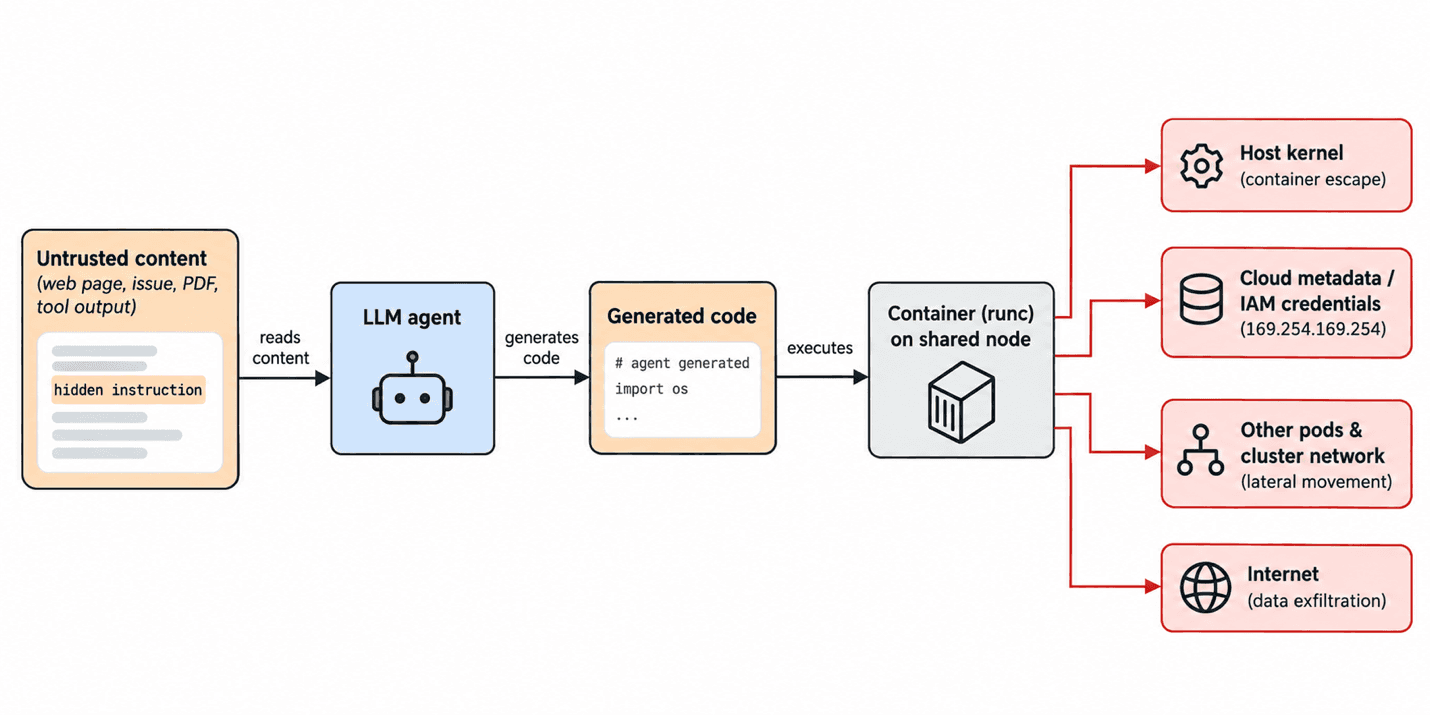
Why a normal container isn't enough: container isolation vs. microVM and the shared kernel
A container is a process with namespaces, cgroups, seccomp and capabilities applied. For code you trust, that's a solid boundary. But every container on a node shares the host kernel, so every syscall the agent's code makes lands in the same kernel that runs your kubelet, your other tenants and your node credentials. One kernel vulnerability is enough to cross that boundary, and Linux ships several privilege-escalation CVEs every year.
What agents need beyond isolation
Agent workloads also behave differently from typical Kubernetes workloads:
They're stateful singletons: an agent session has a workspace, installed packages and intermediate files.
They need a stable identity, because the agent must reach its sandbox again on the next tool call.
Startup time matters. Users are waiting for a response, so a 30-second cold start per tool call is noticeable.
They're idle most of the time. Sessions pause while the model thinks or the user reads, so you want to hibernate them instead of keeping them running.
Deployments and StatefulSets don't model this well. Agent Sandbox covers the lifecycle, and Kata covers isolation underneath it.
How Kata Containers work: RuntimeClass, shim and microVM
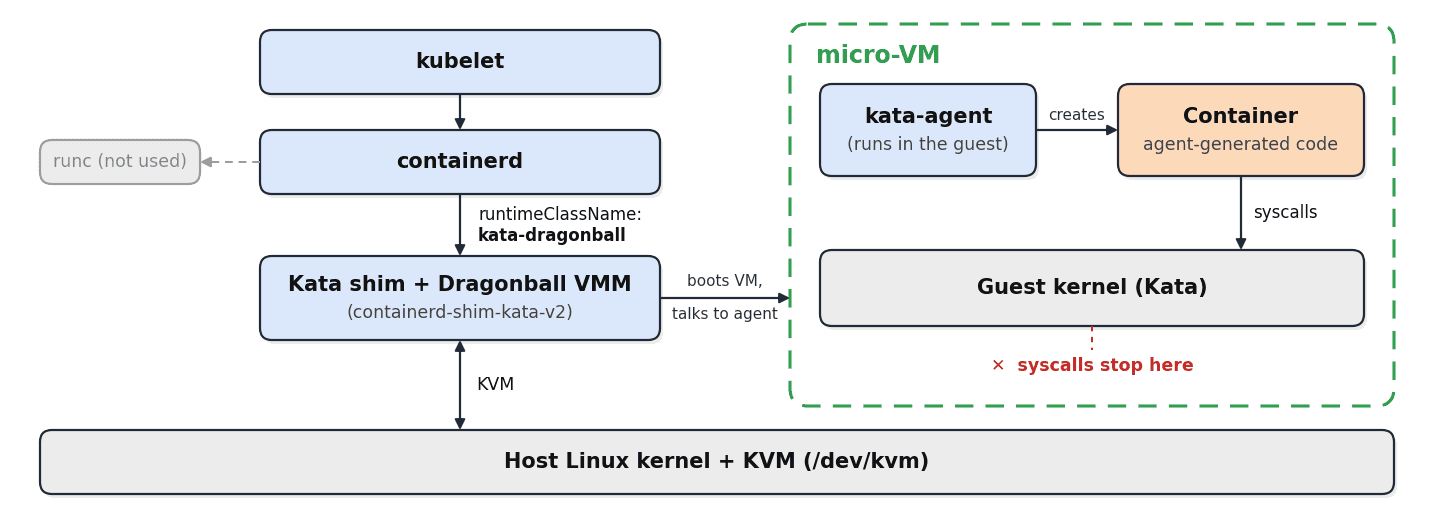
Kata Containers runs each pod inside a lightweight virtual machine, while Kubernetes still sees a normal container. The pieces involved:
kubelet and containerd: nothing changes for Kubernetes. The pod spec just references a different
RuntimeClass.The Kata shim (
containerd-shim-kata-v2): containerd calls it instead of runc, and it launches and manages the VM.The VMM (virtual machine monitor): it boots a micro-VM using KVM. It either runs as a separate process (QEMU, Cloud Hypervisor, Firecracker) or, as in this post, is built into the Rust shim (runtime-rs): Dragonball runs inside the shim process itself.
The guest kernel: a minimal, boot-optimized Linux kernel. This is the kernel the agent's code talks to.
The kata-agent: it runs inside the VM and creates the actual containers there on behalf of the shim.
Kubernetes hooks into this through a RuntimeClass:
overhead tells the scheduler that each Kata pod costs extra CPU and memory for the VMM and guest kernel. scheduling.nodeSelector makes sure Kata pods only land on nodes where Kata is installed.
Kata needs hardware virtualization, which means /dev/kvm on the node, and that requirement shapes the whole setup. Regular EC2 instances historically didn't expose it, so on AWS the straightforward path is bare-metal instances.
Agent Sandbox: lifecycle for agent workloads
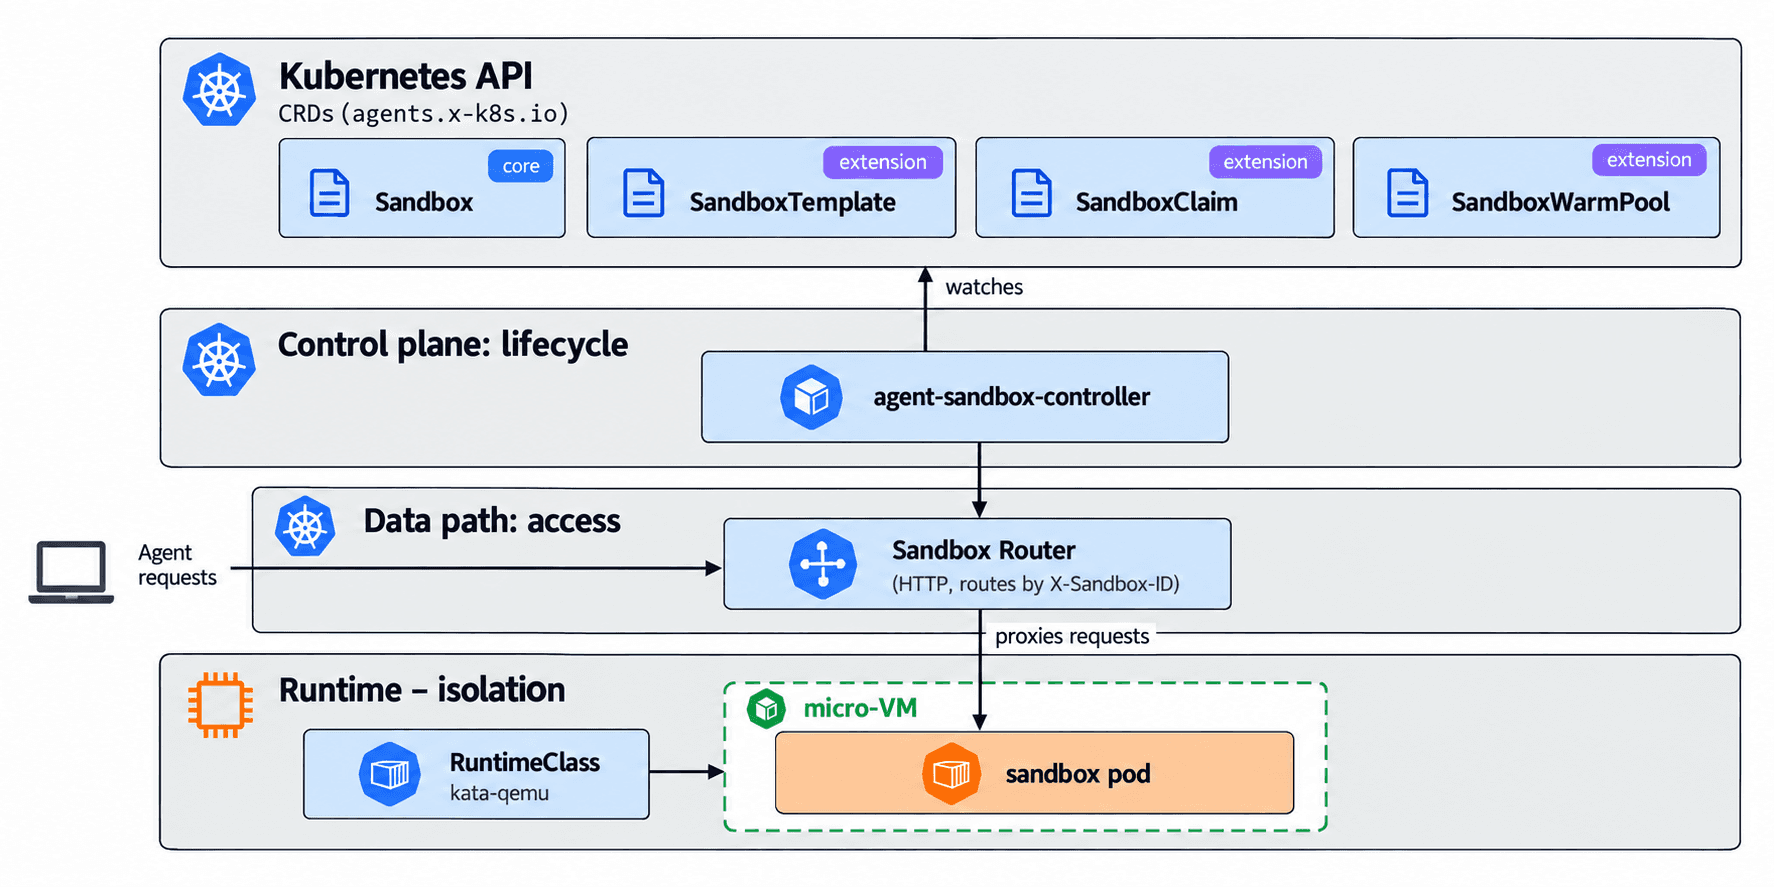
Agent Sandbox is a SIG Apps project that adds a Kubernetes-native API for what it calls "isolated, stateful, singleton workloads". It manages the lifecycle and leaves isolation to the RuntimeClass.
The API:
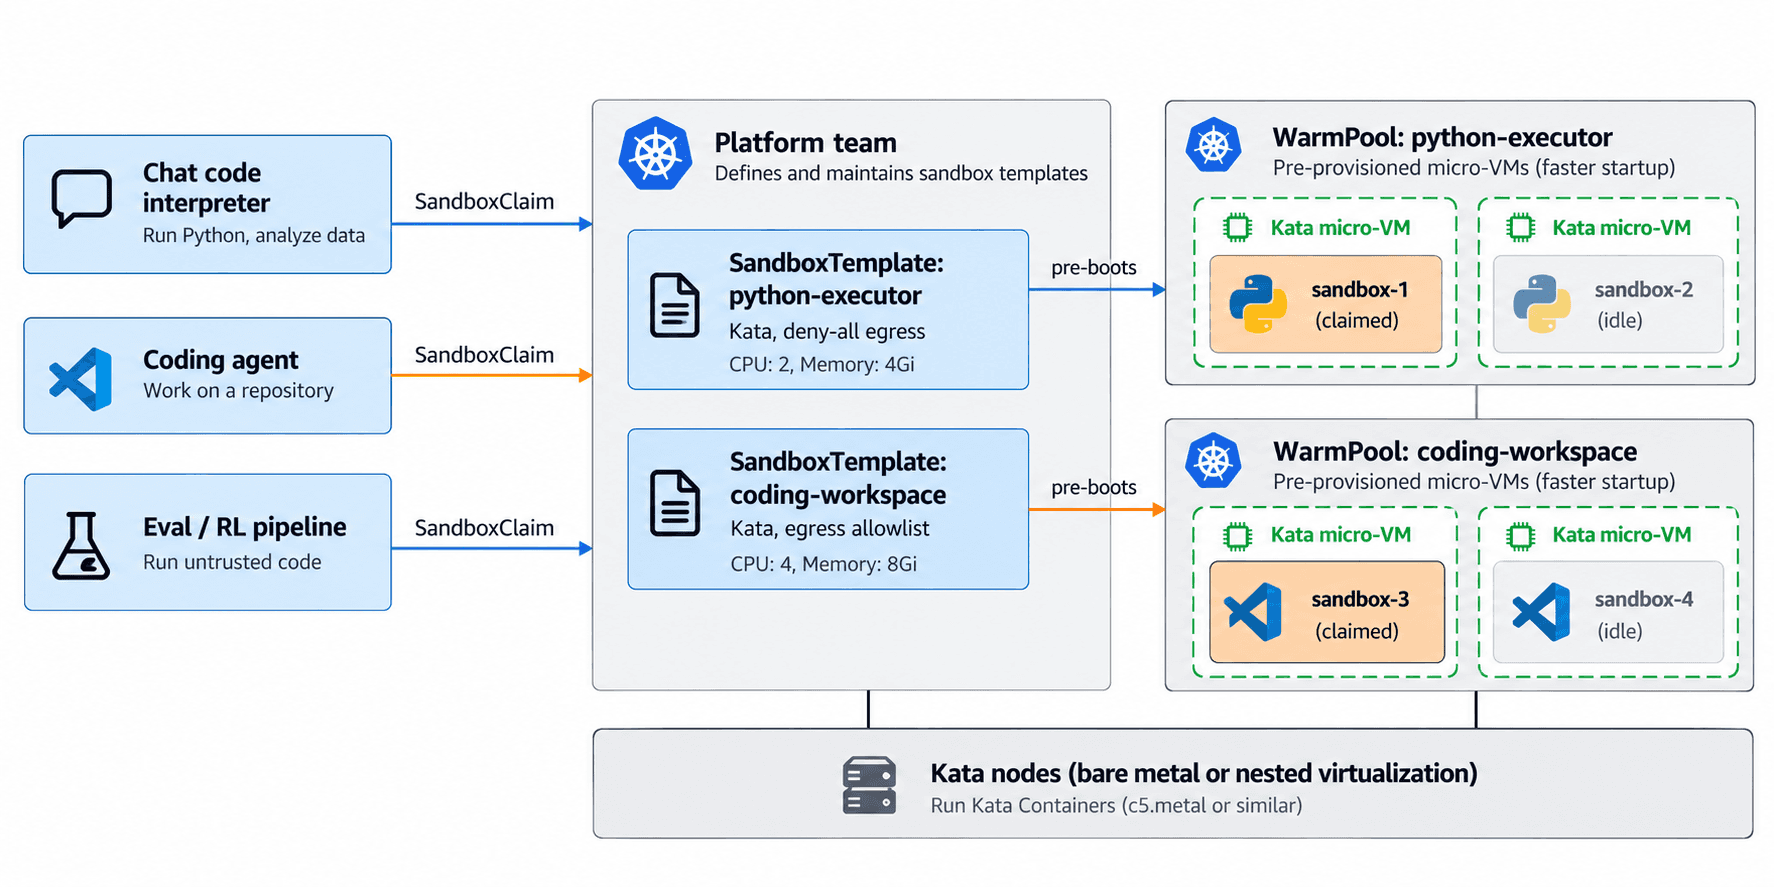
Sandbox(core): one isolated environment with a stable identity, backed by a pod. It has a lifecycle you can pause and resume.SandboxTemplate(extension): a reusable blueprint, for example "Python executor on Kata with no egress".SandboxClaim(extension): a request for a sandbox from a template. This is how an application asks for one without knowing the pod details.SandboxWarmPool(extension): pre-booted sandboxes waiting to be claimed. This hides the VM boot latency.
The fifth piece is the Sandbox Router, an HTTP proxy that routes each request to the right sandbox based on headers (X-Sandbox-ID, X-Sandbox-Namespace, X-Sandbox-Port). According to the project documentation, direct pod port-forwarding doesn't work with secure runtimes like Kata, so the router is the supported access path.
Hands-on: Kata + Agent Sandbox on Amazon EKS
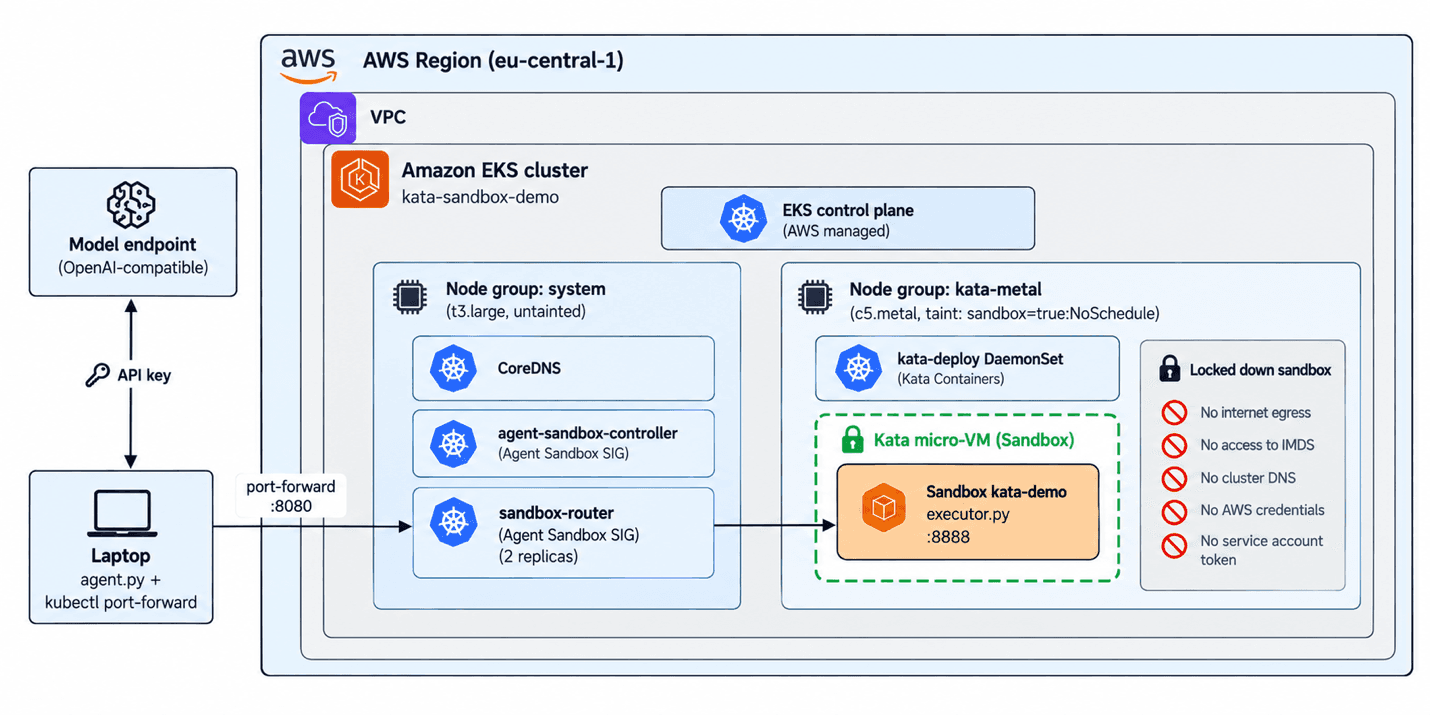
What we're building
An EKS cluster with two managed nodegroups:
system: at3.largefor CoreDNS, the Agent Sandbox controller and the router.kata-metal: ac5.metalwith native KVM, labeled and tainted so only sandbox workloads land there.
kata-deploy, which installs Kata and the
kata-dragonballRuntimeClass on the metal node.The Agent Sandbox controller and router.
A
Sandboxrunning a small Python and shell executor inside a Kata VM. A NetworkPolicy blocks all egress and allows ingress only from the router.An LLM agent on your laptop that runs Python and shell commands in the sandbox and moves files in and out.
Cost warning.
c5.metalcosts about $4.08/h in us-east-1 and somewhat more in eu-central-1, plus $0.10/h for the EKS control plane. Metal billing starts about 20 minutes into the walkthrough, once the nodegroups are created. Step 8 (cleanup) is mandatory. I strongly recommend setting an AWS Budget alert before you start.
All files are in the companion repository: https://github.com/Liquid-Reply/agent-sandboxing-demo
Step 1: Create an EKS cluster with a bare-metal c5.metal nodegroup
The cluster needs:
A bare-metal nodegroup for Kata. Kata needs
/dev/kvm, which on EKS managed nodegroups means a*.metalinstance (herec5.metalwith 96 vCPUs). Label it (kata-host=true,workload=sandbox) and taint it (sandbox=true:NoSchedule) so only sandbox workloads land there.Amazon Linux 2023 on that nodegroup, because kata-deploy writes binaries and containerd config onto the host and Bottlerocket's read-only root filesystem breaks that.
An untainted system nodegroup for CoreDNS, the Agent Sandbox controller and the router, none of which tolerate the sandbox taint. Without it they sit in
Pending. A singlet3.large(about $0.08/h) is enough.Network policy enforcement, which the VPC CNI doesn't do by default on EKS. Enable it with
enableNetworkPolicy: "true"on thevpc-cniaddon, otherwise the lockdown in Step 5 is silently ignored.
The relevant part of cluster.yaml:
The full file in the repo also pins autoModeConfig.enabled: false, because newer eksctl versions announce Auto Mode as the default. eksctl doesn't substitute environment variables, so keep the values in sync with env.sh.
Step 2: Install Kata Containers with kata-deploy
kata-deploy is a DaemonSet that installs the Kata binaries, guest kernel and image on the node, configures containerd, and creates the RuntimeClasses.
kata-values.yaml:
Two things here cost me time:
Don't select on
katacontainers.io/kata-runtimefor the DaemonSet. kata-deploy sets that label on the node after it has installed itself, so if the DaemonSet selects on it, you've built a chicken-and-egg problem. The label belongs on the RuntimeClass only, and the chart already puts it there.Set
defaultShim. The chart defaults toqemu-runtime-rs, and onceshims.disableAllhas turned that off, the kata-deploy pod crashloops immediately withDEFAULT_SHIM 'qemu-runtime-rs' must be one of the configured SHIMS for this architecture: [dragonball].helm templaterenders fine either way, because the check only runs inside the container. That's also why I install without--wait: if the pod crashloops,--waitjust hangs for the full timeout.
kata-deploy restarts containerd on the metal node. Give it about a minute after the rollout finishes before you create Kata pods.
Why dragonball: the Go shim (kata-qemu) has been deprecated since Kata 4.0 in favor of runtime-rs, the Rust implementation. Within runtime-rs, the Kata docs recommend built-in VMM mode. Dragonball runs inside the shim process instead of as a separate QEMU or Cloud Hypervisor process, so there's no IPC between shim and VMM, and lifecycle and cleanup happen in one place.
Step 3: Verify a pod runs in its own Kata VM (guest vs. host kernel)
The simplest proof that a pod runs in its own VM is to compare the kernel inside the pod with the kernel on the host.
manifests/kata-smoke.yaml:
The guest kernel is Kata's minimal kernel; the host runs AL2023's kernel. If both are identical, the pod is running on runc and the RuntimeClass didn't apply.
Step 4: Install the Agent Sandbox controller and router
This walkthrough only uses Sandbox. I still install the extensions (SandboxTemplate, SandboxClaim, SandboxWarmPool) because they're what you'd use in production.
Next, the router:
Step 5: Create a Sandbox with a NetworkPolicy that blocks egress
The sandbox runs a small, stdlib-only HTTP API (executor.py) that gives the agent a minimal workspace. It's mounted from a ConfigMap into python:3.14-slim, so you don't need to build an image. The endpoints:
/executeruns Python in a persistent worker process, so variables and imports carry over between calls. If the code crashes the worker, only that state is lost./shellruns a command withsh -c./files/writeand/files/readmove files in and out of/tmp; the root filesystem is read-only./resetclears the Python state.
Every call has a timeout and returns stdout, stderr and exit_code.
The files in sandbox/:
executor.py: the execution API.sandbox.yaml: theSandboxresource.networkpolicy.yaml: the lockdown.kustomization.yaml: bundles everything and generates thekata-demo-executorConfigMap.
The NetworkPolicy removes all egress and allows ingress only from the router on port 8888.
Kata and the NetworkPolicy protect different things. Kata protects the node and the other tenants from the code. The NetworkPolicy protects everything reachable over the network: the internet, other services, and the instance metadata endpoint that hands out the node's IAM credentials. A VM with open egress is still an excellent exfiltration platform.
PolicyEndpoints are what the VPC CNI network policy agent actually enforces. If there's no entry, the policy isn't active.
Step 6: Access through the router
The router resolves the target sandbox from the headers and proxies the request. A missing X-Sandbox-ID returns 400.
A failing urlopen('https://example.com') doesn't prove the egress lockdown; it only shows that DNS is blocked. verify-sandbox.sh runs the full set of checks:
The script checks:
guest vs. host kernel, and that the pod hasn't restarted;
raw TCP egress by IP to the internet, to IMDS (
169.254.169.254) and to cluster DNS;ingress from a throwaway pod that isn't the router;
that the router path works, the process runs as uid 65534, and no ServiceAccount token is mounted.
It exits non-zero if anything fails.
Step 7: An agent that uses the sandbox
The agent plans on the trusted side, and the sandbox only executes. That split is what the rest of the setup exists for.
agent/agent.py runs on your laptop and talks to a proxy through the OpenAI SDK, so any tool-calling model behind the proxy works. I use our internal LiteLLM endpoint; point it at your own proxy or any other OpenAI-compatible gateway. The agent exposes four tools to the model: run_python, run_shell, write_file and read_file. Every tool call goes through the port-forward and the router into the Kata VM.

The proof scenario asks the model to:
compute the SHA-256 of the first 1000 primes (it has to run code; it can't guess this);
try to reach
https://example.comfrom inside the sandbox and report what happened;report the kernel release.
A tested run with LITELLM_MODEL=gpt-6-luna finished in two turns:
What to look at in the output:
The digest is deterministic. The code the model writes differs between runs, but the SHA-256 must not, which proves the model really executed code instead of making up an answer.
The kernel release is the Kata guest kernel, not the AL2023 host kernel.
The internet request fails and the agent still completes its task, so the egress lockdown doesn't break the agent.
The API key only ever existed on the laptop. There's nothing in the sandbox to steal, and no route out if there were.
Then run it interactively:
The breakout scenario explicitly asks the model to try to get out (IMDS, the ServiceAccount token, the Kubernetes API, the internet, writes outside /tmp), which makes it a good live counterpart to verify-sandbox.sh. /approve on shows a human-in-the-loop pattern: every tool call waits for your confirmation before it reaches the sandbox.
For a one-off task without the REPL, run uv run agent/agent.py "your task". If a tool call reports sandbox unreachable, the port-forward has died.
Step 8: Cleanup (mandatory)
The EBS check in verify-cleanup.sh is region-wide and may show unrelated volumes. Afterwards, switch your kubeconfig back with kubectl config use-context <your-usual-context>.
If you spread the demo over several sessions, scale the metal nodegroup to zero instead of rebuilding the cluster:
Where sandboxing fits
The executor in this post is the smallest useful building block. The same pattern (lifecycle via Agent Sandbox, isolation via Kata, lockdown via policy) works for:
Code interpreter backends, like "run this analysis on my CSV" in a chat product. Every session gets its own VM, and files never touch shared infrastructure.
Coding agents with persistent workspaces: a sandbox per task or pull request, with the repository checked out and dependencies installed. It's hibernated while the agent waits for CI and resumed afterwards.
Reinforcement learning and evaluation rollouts, with thousands of short-lived, identical environments. Warm pools matter most here.
Multi-tenant agent platforms as part of an internal developer platform. Teams request sandboxes via
SandboxClaimagainst templates that platform engineering defines, with runtime, network policy and resource limits baked in.Isolated MCP servers and tools. Third-party tool servers are code you didn't write, so it makes sense to treat them like agent-generated code.
What sandboxing doesn't solve
A VM boundary doesn't decide:
what the agent is allowed to reach. Egress policy is a separate control, and it gets harder once you need allowlists.
which credentials the agent holds. The best pattern is the one used here: secrets stay on the trusted side, and the sandbox only receives code.
who the agent acts as. Agent identity and authorization toward internal APIs are still an open design problem.
whether the result is correct. Isolation limits the damage but doesn't validate the output.
Agent Sandbox is also young and moves fast (the router namespace change between versions is one example), so pin versions and re-test on upgrades.
The same goes for performance. This demo uses Dragonball, but it doesn't benchmark it, so measure cold start and pods per node on your own workload before you size a platform around it.
Conclusion: an AI agent sandbox with Kata Containers, Agent Sandbox and a NetworkPolicy on EKS
The setup in this post combines Kata Containers, Agent Sandbox and a NetworkPolicy on Amazon EKS to sandbox AI agent code. Agent-generated code is untrusted code, and a shared-kernel container isn't a strong enough boundary for it. Kata Containers gives you a VM boundary behind a normal Kubernetes interface, and Agent Sandbox adds the lifecycle agent workloads need. On EKS, a bare-metal nodegroup turns that into a reproducible setup in about 35 minutes.
The pattern I'd keep regardless of tooling: let the model decide on the trusted side, and let only the sandbox execute, with nothing inside worth stealing and no way out.
Share